
With Nursegrid Manager, you can build a schedule to be distributed to your staff or allow your staff to self-schedule using the Nursegrid Mobile app. Read on to learn how to set up your schedule coverage requirements, manage self-scheduling, and publish your schedule with Nursegrid Manager’s Schedule Builder.
Coverage Requirements
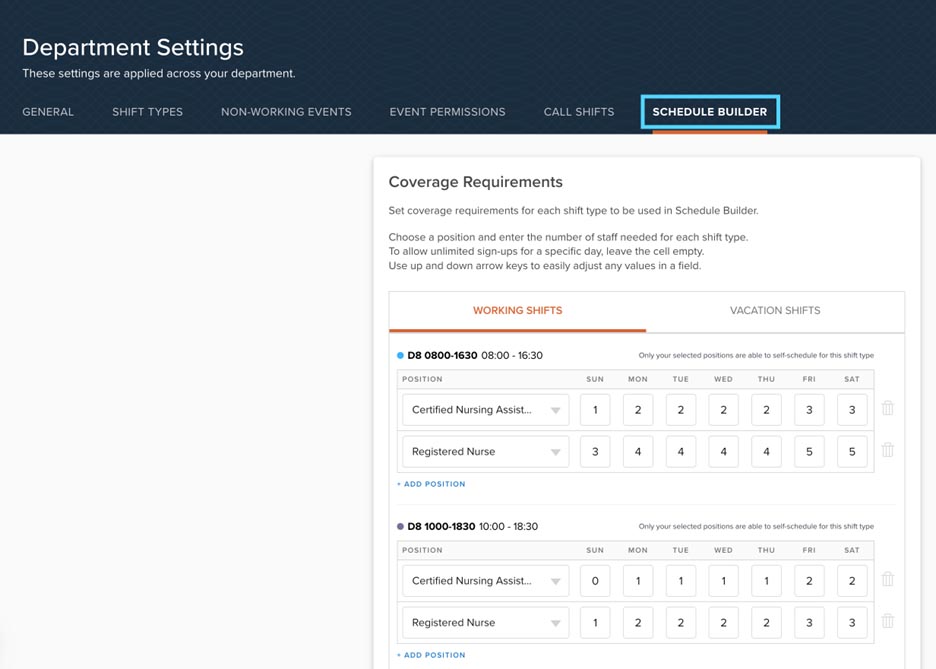
Before you build your first schedule, we recommend setting up your schedule coverage requirements. Navigate to the Department Settings page in Nursegrid Manager, then click the Schedule Builder tab at the far right.
Your coverage requirements are department-specific and will only be applied to the schedule building process in Nursegrid Manager. Coverage requirements currently do not appear elsewhere in the app and do not automatically create or approve open shift requests.
These coverage requirements are based on the custom shift types you’ve set up for your department. You can set coverage requirements per position and day of week for all of your shift types as well as your custom vacation shifts.
To set up your first coverage requirements, just click Add Position, select the position you’d like to create a requirement for, then enter your desired coverage in each cell.
A few things to note about coverage requirements:
- A coverage requirement cell that is left blank will allow an unlimited number of staff of the selected position to sign up for this shift type via self-scheduling on that day.
- A coverage requirement cell with a value of 0 will prevent any staff of the selected position from signing up for this shift type via self-scheduling on that day.
- You do not have to set coverage requirements for every shift type or every position. If you do not set a coverage requirement for a shift type that is included in self-scheduling, an unlimited number of staff of all positions will be able to sign up.
- If you set at least one coverage requirement on a shift type, only staff with positions associated with a coverage requirement for that shift type will be able to self-schedule that shift type. Example: if you set only an RN coverage requirement for Day shifts, no LPNs or CNAs would be able to sign up for that Day shift in self-scheduling.
Any coverage requirements you don’t want can be deleted by clicking the trash can icon.
Setting Up Self-Scheduling
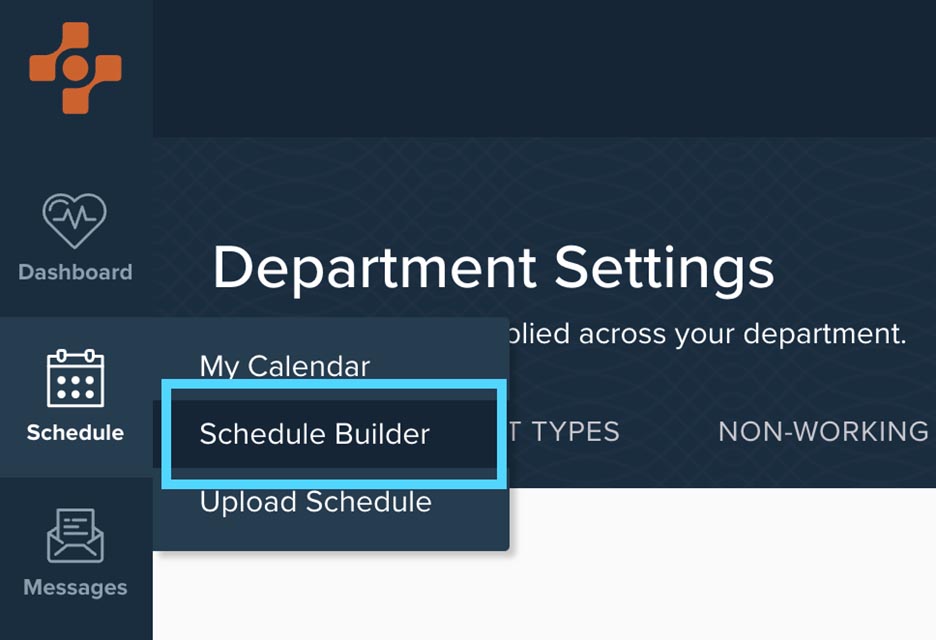
To access Schedule Builder, hover over your Schedule tab in the left navigation menu and click Schedule Builder. Once there, you can get started building your schedule draft and enabling self-scheduling.
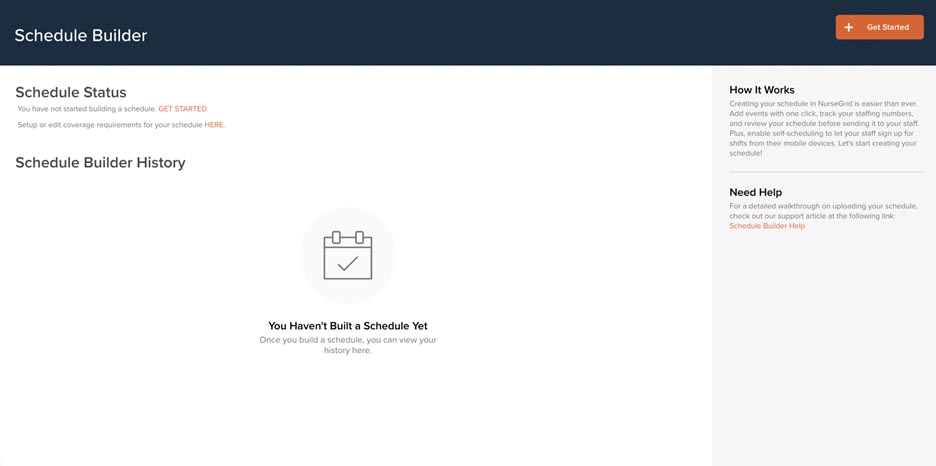
To create your schedule draft, click Get Started.
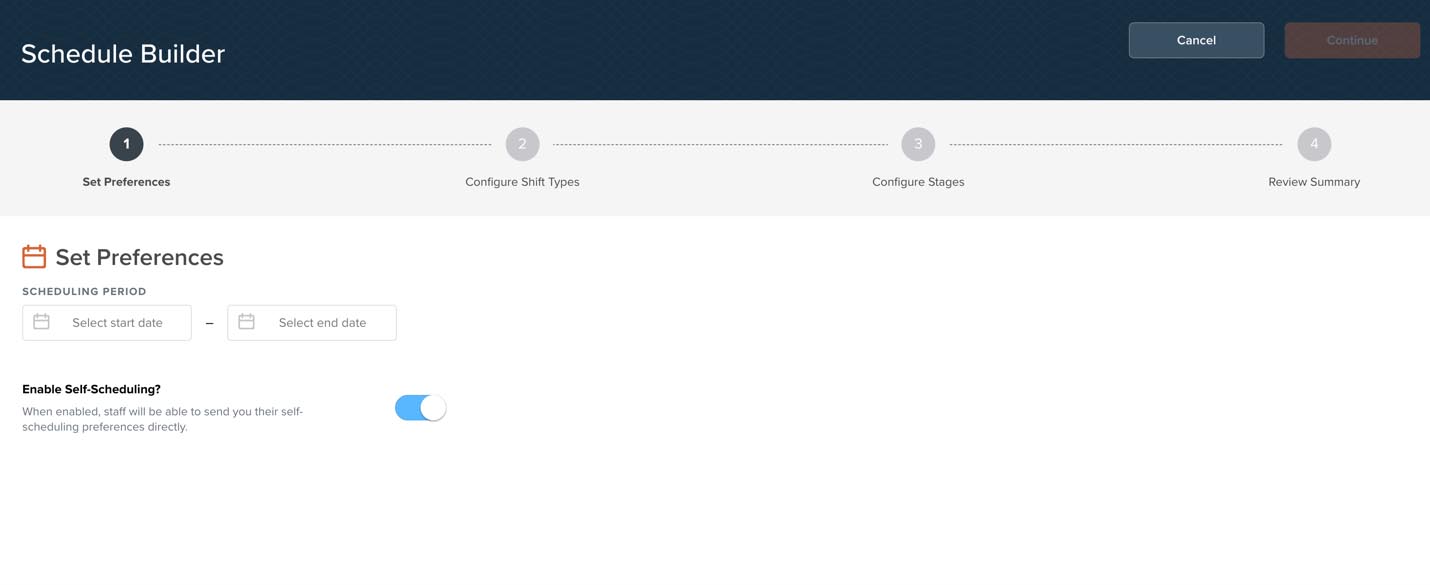
First, you’ll select your scheduling period by using the date selectors as shown below. Schedules in Nursegrid can be built for up to six weeks at a time.
If you’d like to enable self-scheduling, turn on the Enable Self-Scheduling toggle. This will add two more steps to the draft creation process.
Once you’ve selected your scheduling period, you’ll move on to setting up the shift types your staff can self-schedule for on the Configure Shift Types step.
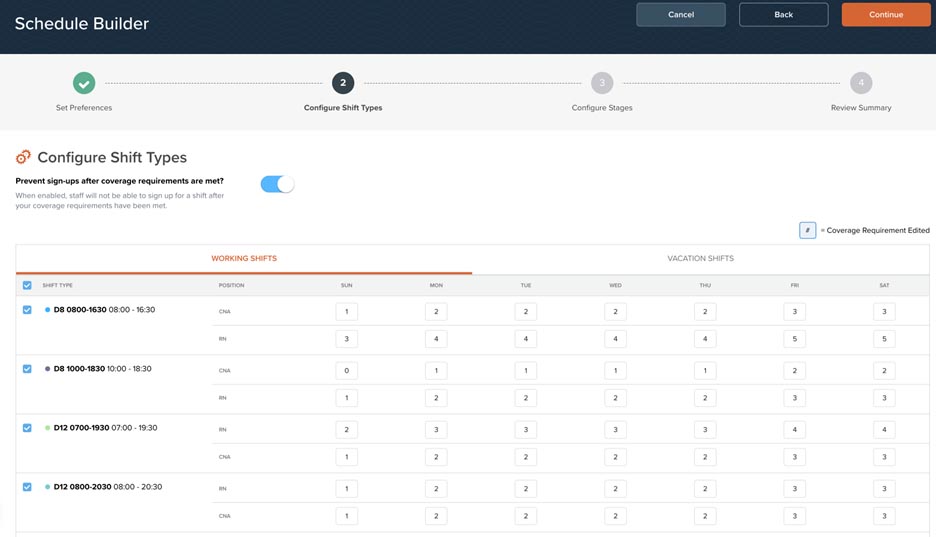
Here, you will select the shift types you wish to allow your staff to be able to sign up for. If you toggle on Prevent sign-ups after coverage requirements are met, your staff will not be able to sign up for shifts if the coverage requirement has already been met. Toggling this off will allow them to sign up for shifts past the coverage requirement.
If you edit a coverage requirement here, note that it will not change the Department Settings coverage requirements. Edited coverage requirements will only apply to the draft where they are edited.
Note that any changes to shift types that occur after the creation of a Schedule Builder draft will not be applied to that draft. Shift type edits will only take effect for drafts created after those changes are made. You are locked into the shift types you have at the point of draft creation.
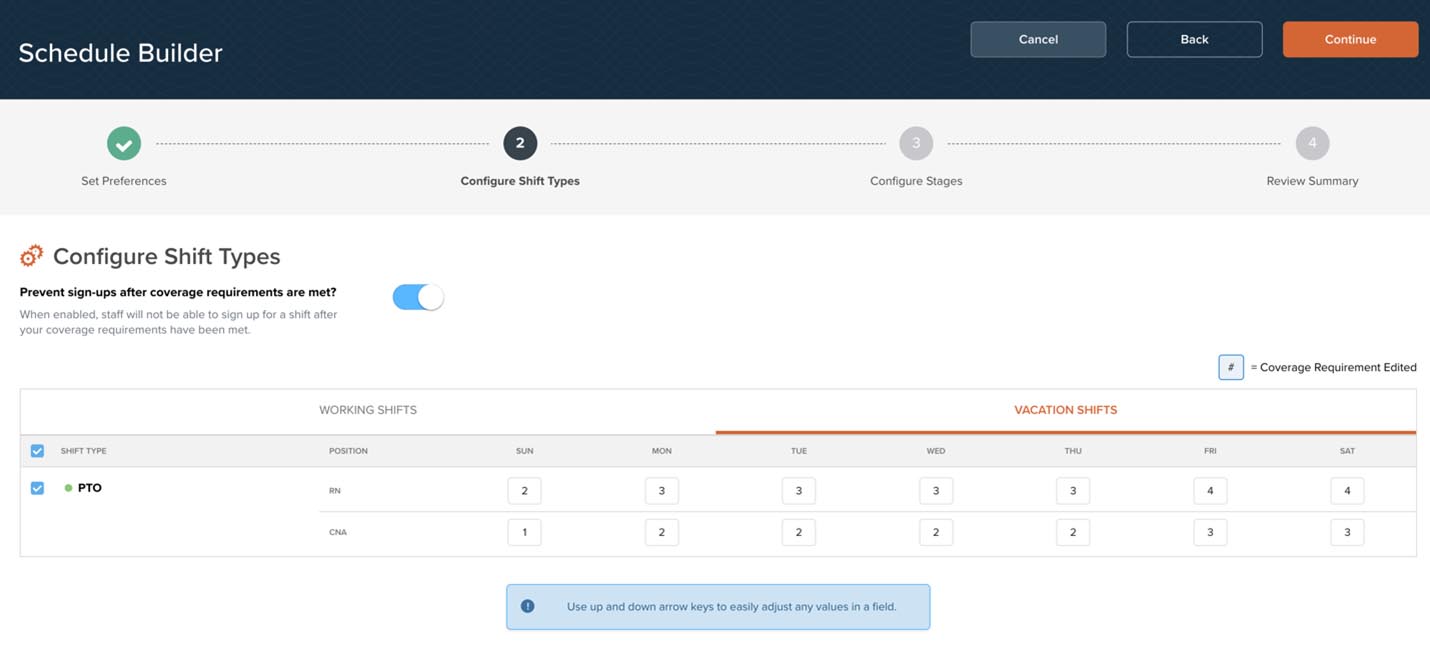
You can also let your staff sign up for custom Vacation Shifts with or without coverage requirements in this process.
Once your shift types have been configured, you’ll move on to the Configure Stages step.
Stages are the periods during which groups of staff can sign up. Stages can be based on FTE status, position, or tag. A Schedule Builder may only have stages set by a single criterion, for example, you can’t set one stage by position and another by FTE at this time. Every stage must be based on the same original criterion.
First, select the overall window during which you want to allow your staff to self-schedule. Then you can create stages that must fit within that window, each with their own start and end time. You can create as many stages as you desire but your staff may only be in one stage per Schedule Builder.
Note that if a staff member does not match the criteria for any of the stages, they will be excluded from self-scheduling. Any staff not included in a stage will be listed in the “Unassigned Staff” section at the bottom of the page.

The final step of the process is to review your selections on the View Summary page. If everything looks good, tap the Create Schedule button to submit!
Note that at this point, schedule drafts cannot be edited. If you need to change the dates for which you are scheduling, you will need to delete the draft and create a new one with the updated dates. To access a draft in progress, navigate to Schedule Builder in the Schedule fly-out menu and then click “View Schedule in Progress.”
Canceling self-scheduling
You cannot end a self-scheduling timer early. If you wish to cancel self-scheduling, all your staff’s previously submitted preferences will be lost, and the draft will be deleted. To cancel self-scheduling, delete the entire Schedule Builder draft. If self-scheduling is canceled within 24 hours of the sign-up period beginning or during the sign-up period, your staff will receive a push notification letting them know about this change.
Balancing and Publishing Your Schedule
Once your staff have submitted their preferences and your scheduling period is complete, you can begin creating your schedule.
Navigating Schedule Builder
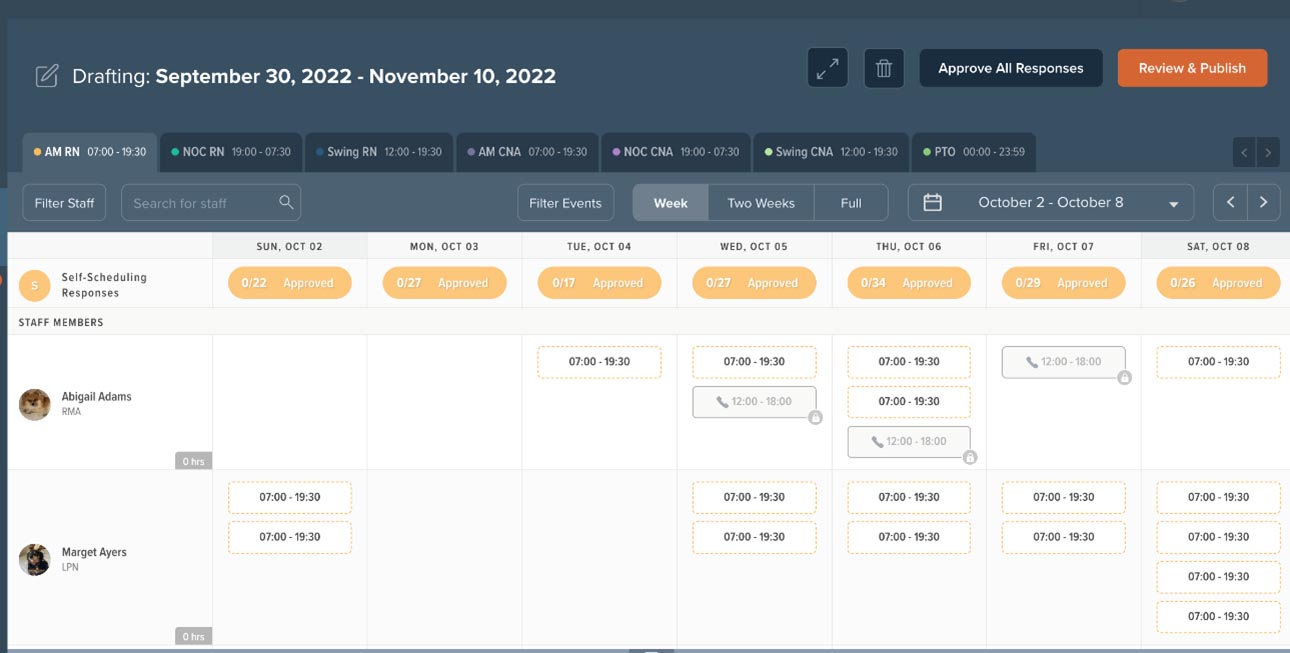
Your department’s shift types are laid out as tabs across the top of the Schedule Builder page. All shift types are listed here and can be scrolled through using the right/left arrows at the end of the row. Clicking a shift type tab in Schedule Builder will show the shifts of that type and clicking in the scheduling grid below will add a shift of that type to the selected staff member.
Down the left side of the screen is a list of your department’s staff members ordered alphabetically by last name. Each staff member is listed with their full name and position; hovering over a staff member presents a card with further information, including contact information, applied tags, credentials, hire date, and FTE.
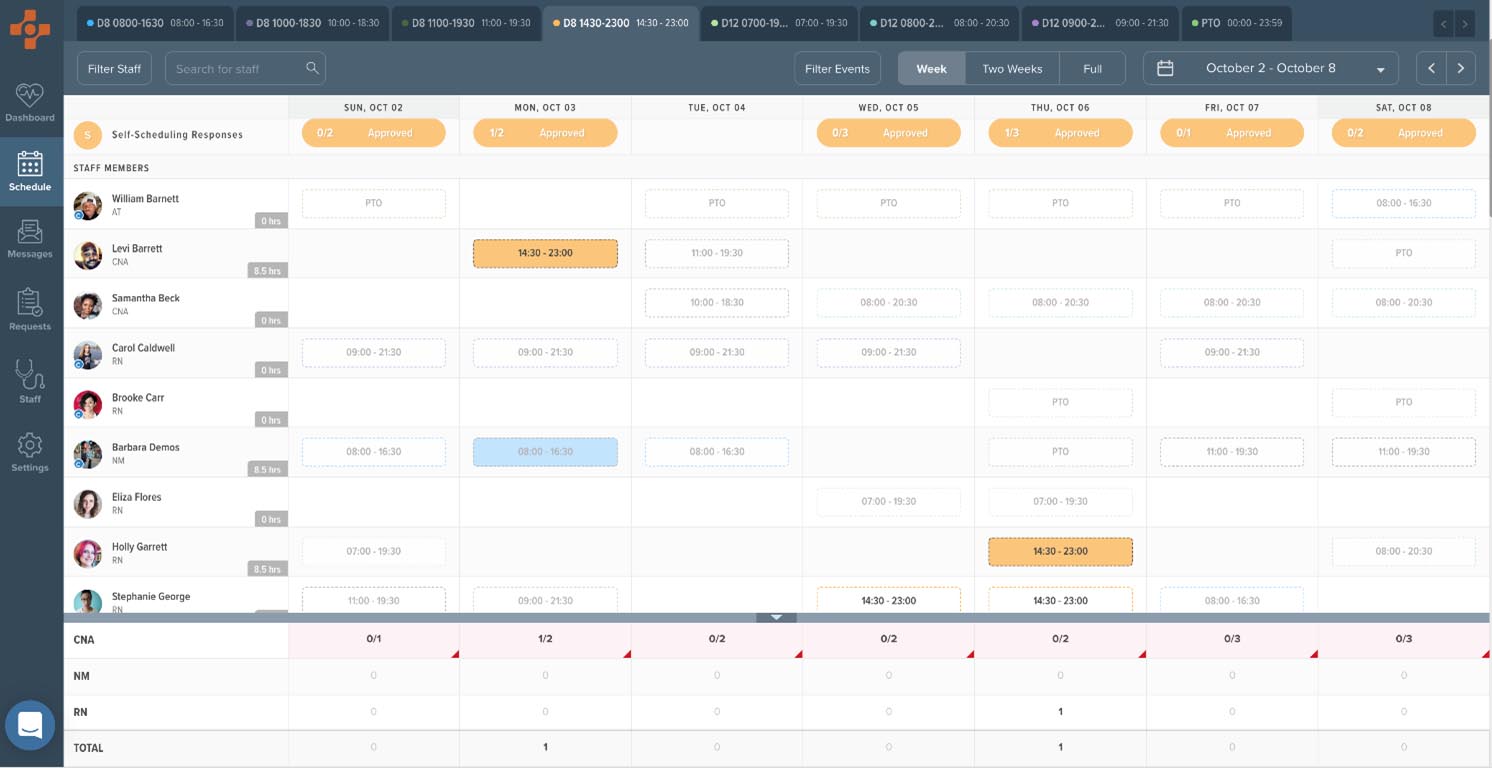
At the bottom of the scheduling grid, you will see a matrix that displays the total number of users scheduled versus the coverage requirement for that shift type per day.
If a coverage requirement for the position of the staff member being assigned exists, the cell will display a fraction. As staff members of that position are assigned for the day, the numerator will increase but the denominator will always remain the same.
A few things to note about these cells:
- If your coverage requirement is not met, the cell will be red with a dog-ear appearing in the lower right corner.
- If your coverage requirement is met, the cell will be gray with no dog-ear presented.
- If your coverage requirement is exceeded, the cell will be purple with a dog-ear presented in the upper right corner.
- If a coverage requirement for the position of the staff person being assigned does not exist, the cell will display a single whole number that represents the number of staff of that position assigned for that day. These cells will not be color-coded or dog-eared.
As there are currently no coverage requirements for On Call shifts, a staff member assigned to an On Call shift will be counted once in their position row and once in their On Call row. Similarly, for charge shifts, staff will be counted once in their position row and once in their Charge row.
Staff without positions will be counted together in the Other row.
The Total row will display a count of all assigned staff for that day, regardless of position.
You can resize the matrix by hovering over the top edge and clicking and dragging to the desired height. It can be collapsed to just the total row by clicking the arrow in the middle of the top edge.
Viewing Schedule Builder
You can view Schedule Builder drafts in either Week or Full views.
Week view shows the total scheduled hours of each staff member for the week being viewed; note that this is not available in Full view. In Week view, Schedule Builder events will show a colored pill with the shift times inside the pill. You can navigate between weeks by clicking the arrows on the date picker in the middle navigation bar or by clicking the date picker and selecting a different week to view.
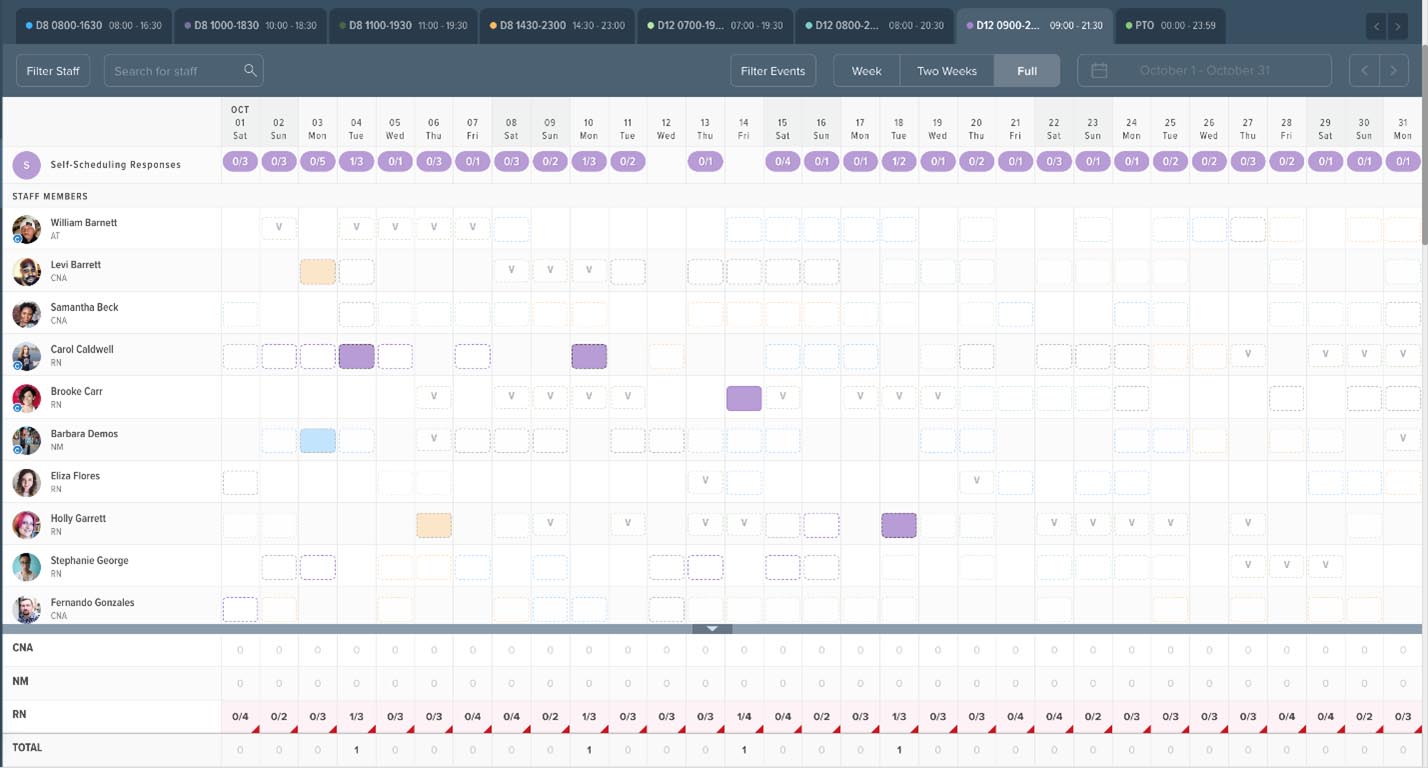
Full view shows the entire scheduling period across the screen. Scheduled hours per staff member are not shown in this view and neither are shift times.
Schedule Builder can be expanded to full screen by clicking the icon in the top-right corner with opposite-facing diagonal arrows. Full screen hides the browser bar and top menu bar and magnifies Nursegrid Manager to encompass the entire screen.
If you want to change the events or staff that are shown, you can use the Filter Events and Filter Staff options. You can select the following options using the Filter Events button:
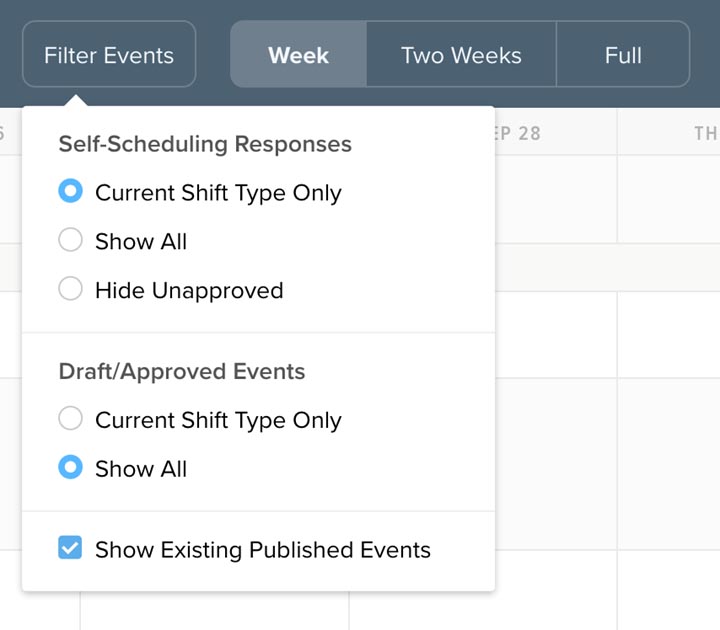
Self-Scheduling Preferences:
- “Current Shift Type Only” – only shows self-scheduling preferences of the selected shift type (and hides all other shift type preferences)
- “Show All” – shows all self-scheduling preferences of all shift types
- “Hide Unapproved” – only shows approved self-scheduling preferences
Draft/Approved Events:
- “Current Shift Type Only” – only shows drafted events or approved preferences of this shift type
- “Show All” – shows all drafted events and approved preferences of all shift types
- “Show Existing Published Events” – shows any events that were published prior to or outside of this Schedule Builder draft
You can approve self-scheduling preferences within any of these filtered views, and on Week and Full view.
Adding, Editing, and Removing events
To add an event, click any cell and an event of the shift type tab that you are currently on will be added. If an event already exists, you can add an additional shift of a different type to that same day by clicking in the cell area but not on the event pill itself.
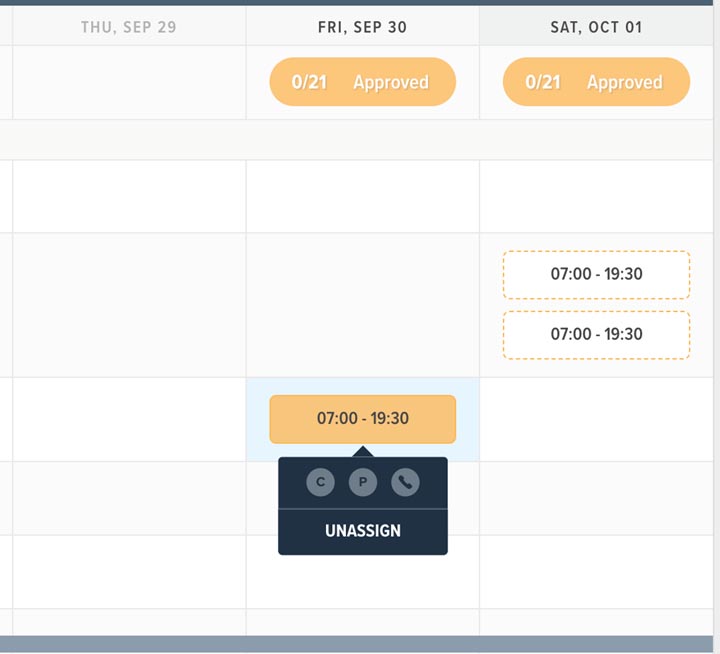
Event editing is limited in Schedule Builder to adding a charge, preceptor, or on call modifier. To remove an event, simply click the event then click Unassign in the dropdown.
Reviewing and Assigning Self-Scheduling Responses
Preferences are shown in the scheduling grid as white pills with a dashed border in the color of its shift type. Preferences can be assigned by clicking the pill once. Clicking the pill again presents a dropdown where charge, preceptor, or on call status can be assigned.
Self-scheduling responses can be assigned in a variety of ways: individually on each shift type tab; by shift type and date via the modal; or all at once.
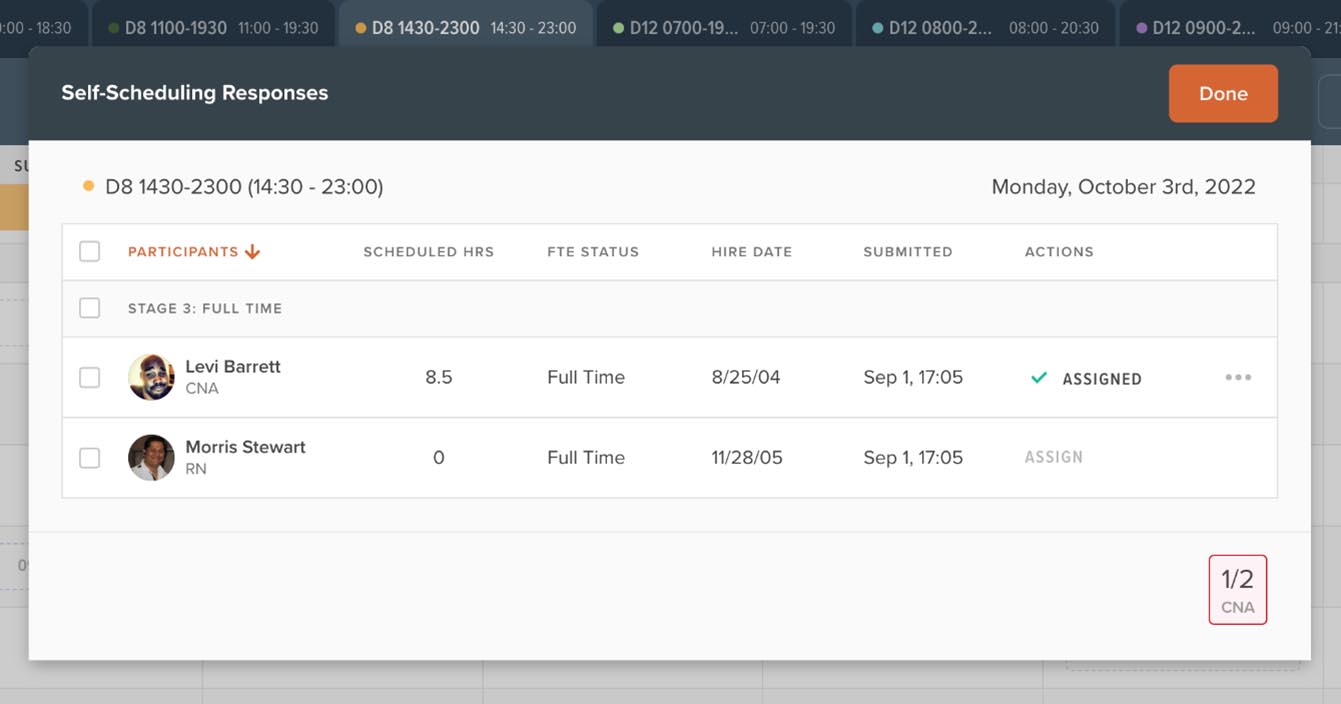
To assign multiple preferences for a single shift type and day, launch the Self-Scheduling Responses modal by clicking the pill in the top row of the table for the date you want to approve. Select the responses you want to approve (using the checkbox in the header to select all) and then use the Bulk Actions dropdown in the lower left to assign all.
Approving All Responses
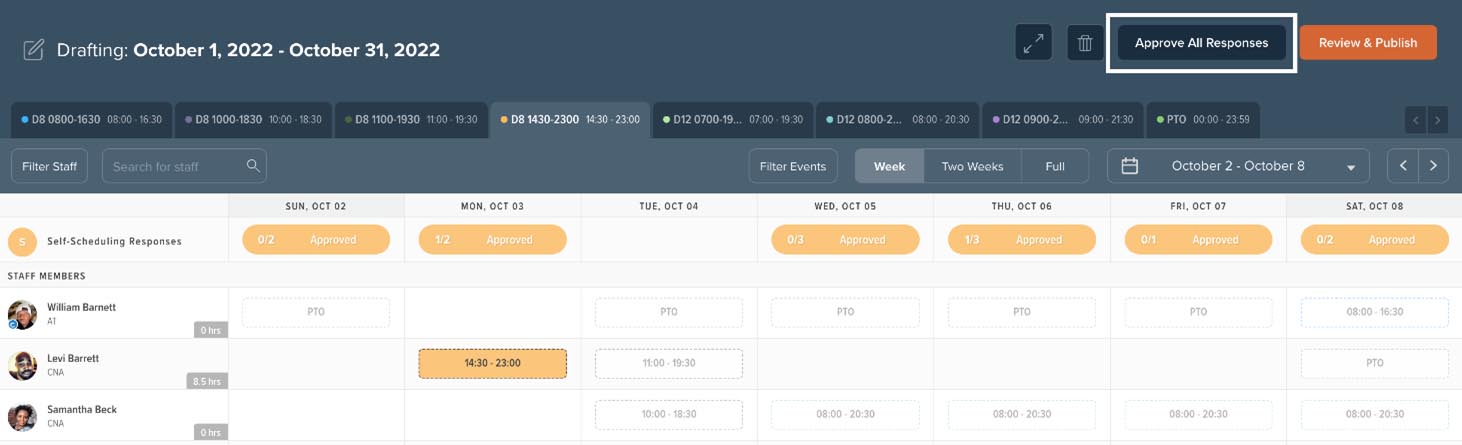
If you manage a large department and your staff are accustomed to self-scheduling, you may prefer to use the Approve All Responses button and simply unassign shifts from dates that are over-scheduled. Approve All Responses will approve every response for every day and shift type. Because this process may take a moment, you will see a counter in the lower right corner of the browser letting you know that the responses are being approved and how many have been approved of the total as the process runs.
Deleting a Schedule Builder Draft
To delete a Schedule Builder draft, simply click on the trash can icon in the top right.
Reviewing and Publishing a Schedule Builder Draft
Once you have added all your events to the Schedule Builder draft, click Review & Publish to confirm your event additions. If you’d like to change anything about your schedule, you can click Back to Edit and be returned to the Schedule Builder draft. If you are happy with your draft, proceed by clicking Publish & Notify!
Viewing Historical Schedules
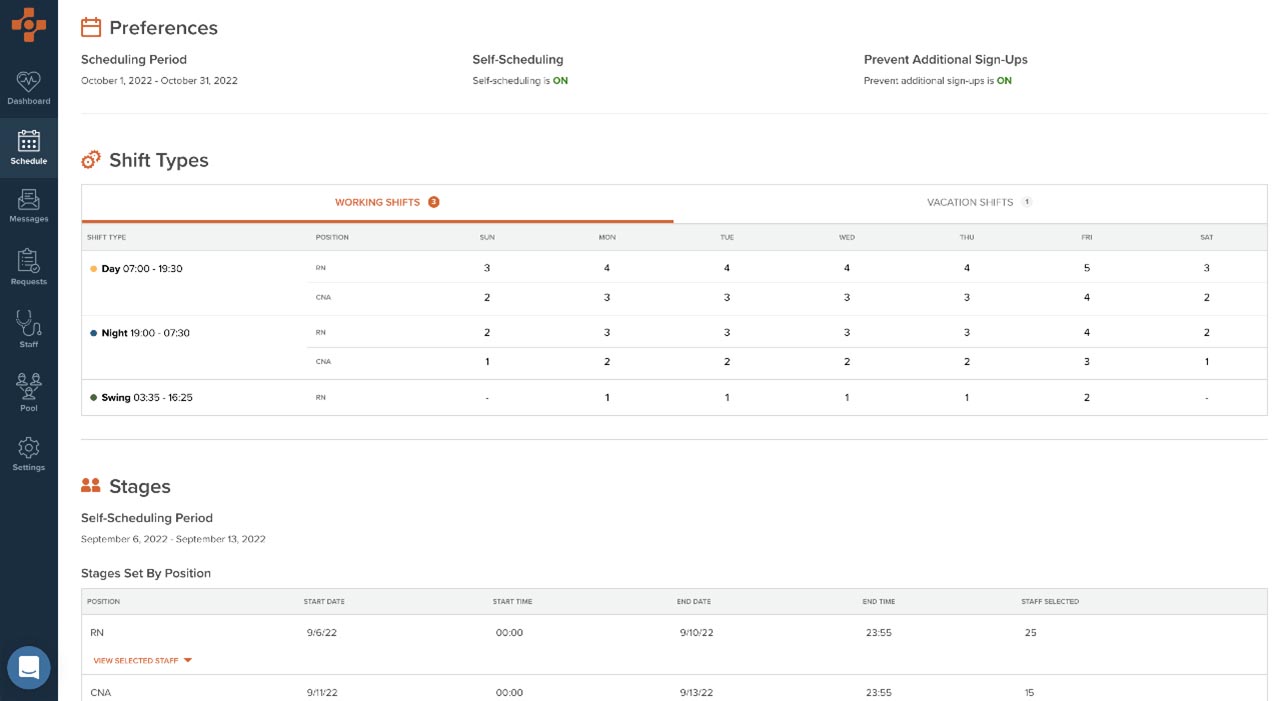
You can now view historical schedules by visiting the Schedule Builder landing page and clicking View Details for any previous schedules. Each schedule will have a corresponding details page that shows the selections made for that schedule, including scheduling period, self-scheduling status, lock status, and any shift type and stage configurations.
